We at HPI want to share with you some of our tips that we use to make our bodies fresh.
Protective Body Film
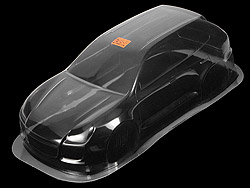
Every HPI body comes with a convenient protective film that prevents overspray from getting on the outside of your body. Be sure to peel it off before you put your stickers on! This body film allows you to cut out vents, wheel wells or body post holes (on non-HPI cars, see below) while the body is still clear. You can also use a permanent marker to outline the windows and place painting ideas on the body, so you can visualize how the car will look with the paint on it. If you want to change something while it's still in the drawing phase, you can just use denatured alcohol or motor spray on a rag to wipe away the lines you don't want to use.
Decals Included with Every Body
HPI includes free vinyl decals with every body we make. Most have window outlines to cover the edges of the windows, headlights and tail lights, car logos and sponsor decals. Air intakes for brakes or engine cooling are included as well, to 'finish out' the detailing of your car. If you have decals left over from other bodies, you can mix and match the lights and other features of the car to create a 'custom' car, such as the Honda Civic Type R (which really does exist!).
Body Mount Dimples
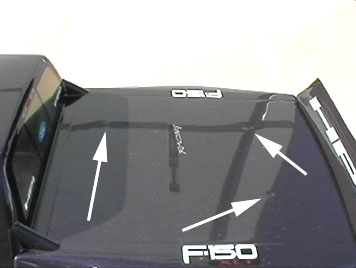
HPI bodies come with body mounting locations on the body itself. These 'dimples' can be hard to see, but located on each of our bodies are the locations to drill for the front and rear body mounts, the hole for the antenna, plus the hole for a Nitro engine glow plug igniter (on wide bodies). The front body mounts have both sets of holes marked, depending on whether you use the bumper body posts or the front bulkhead body posts. Also included on all of our 200mm wide bodies are dimples to make an access hole for the side muffler from our Nitro RS4 2 and RTR Nitro RS4 kits, and a glow plug igniter hole so you don't have to take the body off to start the car!
These body post markings will help make sure you drill the holes in the exact spots for whatever HPI RS4 car you may have. The sedan and street truck bodies will also fit perfectly on the standard Tamiya (TAO2/3) sedan body mounts.
Perfect Wheel Wells
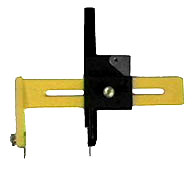
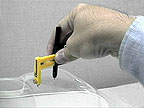
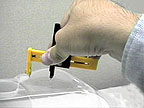
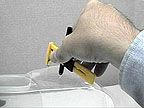
In order to make our wheel wells look perfect, we use what's called a compass cutter, available at art supply stores. The most popular one is from a company called Olfa, and is basically a compass with a blade on the outside instead of a pencil or pen. The exact model of circle cutter we use is the CMP-1. X-Acto also offers a circle cutter, the part number from them is X7753.
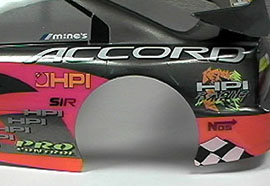
Olfa Circle Cutter Finished Product with a Circle Cutter
Shown above is the compass cutter (also called a circle cutter), and the excellent result of using this tool on the Accord body that is on the front of our RS4 Pro box.
To use the compass cutter, find the center mark of the wheel well (standard feature on all HPI bodies) and put the pin where the center lines meet. On some bodies, the center mark can be 'hidden' by letters or symbols, but it's there, trust us!
Poke the pin through the center mark, so you have something stable the blade can rotate around. With the body resting against something so it is stable and on its side, adjust the radius of the circle that will be cut until you are happy with the size of the circle. HPI bodies come with trim lines around the wheel wells, so you can use those lines or go wider or narrower, if you wish. Making sure the blade is sharp and the center pin is secure, put it firmly against the Lexan and run the blade around in a full circle. Do this two or three times, and you'll soon be able to push out the circle with your fingers, and there you go, a perfect circle! Trim the body where the wheel well meets the ground effects with Lexan scissors so the wheel well doesn't look too funny, then you can use a fine-grit piece of sandpaper to smooth the edges of the circle.
If you race, we recommend that you cut out a little extra material at the rear of the back wheel wells. This will help prevent the body getting stuck on the wheel if someone were to rear-end you. Have you ever heard a driver yelling, "The body! Check the body!" when their car slows to a crawl? What happened was that driver got in wreck and the rear quarter panel of the car was forced onto the rear wheel, which was spinning, and since the body can't rotate around the wheel the car came to a stop. Prevent this by cutting more material out of the rear wheel well. Make it come straight down, and you should rarely, if ever, encounter this problem.
Preparing the Body for Painting
Wash the Body
Wash out the body with warm water and a drop of dish washing soap. Be sure to let the body dry completely in the sun, in front of a fan or use a lint-free cloth to get all the water spots out. The body has to be completely dry for the paint to stick properly.
Mask the Windows
We include super-flexible vinyl window masking with all of our bodies, so you no longer have to use tons of masking tape to make sure you have clear windows!
However, if you don't want to use the free window masking that comes with our bodes, you can follow our old directions below:
Use high-quality masking tape (a brand like 3M, etc.) to mask off the windows. If you can, purchase 1", 2" and 3" wide rolls of the masking tape. This will let you do very creative masking designs. Use the 3" wide roll to mask the windows and large areas of the body, such as the hood, the doors, etc. The thinner widths are easier to bend for striping and fit into crevices in the body easier than the very wide rolls.
Mark off the windows on the outside with a Sharpie or similar black permanent marker, and apply the masking tape to the inside of the body
We will be including vinyl window masking with our bodies in the near future, which will make painting bodies much easier!
Trim the Window Masking
Using the window outlines you made earlier as a guide, use a sharp X-acto blade or similar hobby knife to cut the excess tape off around the windows. The window decals we provide on the decal sheet help cover up some wavy cuts, but still try to make straight cut lines.
Seal the Masking Tape
Use your fingernail or a burnishing tool to press down the edges of the masking tape. This helps prevent the paint from seeping underneath the tape.
Mask the Rest of the Body
By now, you may have a good idea of how you want the car to look. If your car is going to be one colour, you can skip this step. However, if you want a full-out race team paint job or even a two-tone paint scheme, read on. You can get ideas from racing shows on television, pictures of full-size cars from magazines or from pictures of our own HPI bodies! Plan to paint the darkest colours of your paint scheme first, because you don't want a dark tone to your white or fluorescent colours.
Using the same steps from masking off the windows with tape, plan out your paint job:
- Use a Sharpie permanent marker and draw the striping concept on the outside of the body. If you make a mistake, use denatured alcohol on a rag to wipe away any lines you don't want.
- Put colour codes where you want a particular colour to be (BLK for black, W for white, R for red, etc.)
- Again, plan on painting the colours darkest to lightest (black, then purple, then blue, etc., with fluorescent colours and white last).
- If you want to have thin pinstripes, use Pactra masking tape (it is available in widths from 1/16" to 3/8") or Pactra colour pinstriping tape (available in all the basic colours, can be applied inside or outside the body).
- Mask off the lightest area with masking tape (use 3" wide for large areas and 2" and 1" for tough crevices like bumpers and notch backs).
- Again, press down the edges of the masking tape with your fingernail so the paint will not bleed underneath. You'll have much better success if you use new, high-quality tape than old, dried-out or cheap masking tape.
Painting the Body
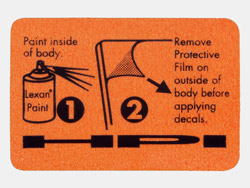
When painting, be sure to use paint that is specifically designed for Lexan plastics! Do not use house paint, enamel, car touch-up paint or similar paints, they are not designed to stick to flexible plastic and can flake off after drying, or actually melt the plastic! We use Pactra spray can or bottle paints exclusively on all of our HPI cars. Parma now has a paint selection but they must be mixed to be used with an airbrush.
To paint your car body, go to a well-ventilated, dust free area. An empty garage, back yard or side area is fine. Make sure you wipe off any fingerprints with a clean lint-free cloth, because you don't want dirty fingers or oils to mess up your paint job!
If you are using a spray can, shake it very thoroughly for about 2 minutes before you start to use it. If it is a sunny day, put all the cans you will use in direct sunlight for about 30 minutes to warm the paint. This will let the paint flow smoothly out of the spray head and prevent splattering. Another way to warm the paint is to fill a basin or sink with hot water, and put all of the paint cans you will use in the water for 30 minutes.
If you are using an airbrush, make sure and follow the directions from the airbrush and paint manufacturer and for thinning the paint properly. Usually a 1 to 1 mixture is sufficient, but you should still check.
When you spray the body, hold it at arm's length (you don't want the paint to blow back in your face or get on your clothes) and keep the spray can or airbrush eight to twelve inches away from the body. Run the spray can in long strokes over the area you are painting, and start spraying a couple of inches before the spray head comes over the painting surface. Stop spraying a couple of inches after the spray head completes its pass of the painting surface. This helps prevent splattering and give an even coat of paint.
Do not spray thick, heavy coats. You will want a uniform light coat without runs. This serves a dual purpose: preventing heavy areas of paint that may look darker than surrounding areas of paint, and it also prevents the thinner in the paint from eating away at the glue of the masking tape, which will cause the paint to bleed under the tape.
When the paint has dried for at least 20 minutes, remove the first section of masking. In an inconspicuous spot, test the dryness of the paint. If you can see your fingerprint in the paint, set the body down and let it dry for another 20 minutes. If you're in a hurry, set the body in sunshine or use a hair dryer on a low heat setting.
Once the paint is dried completely, mask off the next section of your paint job, and paint over that area. Repeat this until you are happy with your new paint job!
Ack!! I messed up...what can I do?!
Don't panic - yet. If it is just overspray or bleeding, you can take it off with one of the body wash products available at your local R/C hobby shop or denatured alcohol on a rag. If you are a nitro racer, you already have a cheap way to remove paint: your nitro fuel! There is enough alcohol in the nitro fuel to remove paint if it is combined with a rubbing action from a towel. Dip a towel in the fuel and rub just the overspray away. It may take a couple of applications, but it does work. Then, use soap and water to clean away the oil from the fuel, and you can continue. The plastic may not be as clear as it was before, but at least it won't be too noticeable. Besides, that's what stickers are for, right?
Paint the Wing
Because of the way the moulds must be done, the Lexan must be vacuum-formed over the form. On some wing moulds, this will cause the overspray film to be on the underside of the wing, on the side you would normally paint. To check, use your fingernail or a hobby knife to scratch both sides of the Lexan. The side that has a very thin layer of flexible plastic come up is the side with the protective film. If it is on the underside of the wing, peel it off before you mask the wing. Paint the wing with the same process you used on the body.
One way to paint the wing (and it's especially helpful when using metallic paints or fades) is to tape the wing at the rear of the body with masking tape, with the paintable side facing to the 'bottom' of the body. This will help you make sure you get the same number of coats on the body and the wing.
Trim the Body and Cut the Body Post Holes
Once all the paint has dried, you'll need to trim the body. Use scissors meant to cut heavy materials or scissors meant specifically for Lexan, an X-acto blade or a hobby knife to cut along the trim lines at the bottom of the car and around the wheel wells.
If this is a body for a Nitro car, cut out the left window and left side of both the windshield and rear window. You can also use a drill or Unibit to cut 1cm or 1/2" holes in the rear window behind the engine for extra cooling. If you run in a ROAR or HPI Challenge event, note that the size of the hole in the windshield may be limited by the rules (normally a circle 2 inches or 50mm across).
Use a rotary tool with a sanding attachment or fine-grit sandpaper to smooth the wheel wells and bottom of the body.
A rotary tool, reamer, drill bit or Unibit will make perfectly round holes for the body posts (look for the dimples!) and antenna.
Attach the Wing
The wing can be attached to the body in a couple of different ways: The first is to use the nuts and bolts that come with the body set. You'll need to use an X-acto knife or drill to make the holes. In order to make sure they line up exactly, use small pieces of servo tape to stick the wing to the body and carefully put the wing on the body, lining it up correctly. Drill or ream out the holes to 3mm or 1/8 in., and use needle nose pliers to hold the nut in place while you screw the wing on. If you have any old motor mount washers, use them on the top and bottom to distribute the load evenly. A bad wreck can rip out the nuts and leave you with two gaping holes where the wing used to be attached.
Shoe Goo can also be used to firmly attach the wing. Shoe Goo is a great adhesive but is very heavy and takes a long time to cure (not a good fix if you're in the middle of a race day!). It is especially useful if you have lost a wing and wish to reattach it.
Trim the Decals
Using a sharp X-acto knife or pair of scissors, trim the decals that came with the body or the optional HPI decals. Try to trim the vinyl close to the colour portion of the decal. A closely-cropped decal will always look better on your car's body than a decal with 1/8" or more of excess clear decal around it.
Window trim lines are easiest to apply if the corners are cut apart from the straight lines. Put the straight lines on first, following the body mold lines for the window, then put the corners on to cover the straight lines. The window lines do a great job of covering any bleeding of the paint or wavy masking lines.
Apply the decals
First, make sure you remove the protective film from the outside of the body! More than one person has forgotten about the film and put on all their decals and had to reapply them once the body film was removed. While this makes a funny story for your friends, you don't want to waste your decals, so make sure you take off the film! It's easy to remove: just peel it back with a fingernail, and pull it off.
Clean the outside of the body with a glass cleaner (Windex, etc.) to make the decals stick better. Make sure to let it dry!
The easiest way to put large decals on is to spray a soap/water solution on the body, apply the decal, and then slide the decal into exact position. To make the soapy water solution, use a few cups of cold water and put one drop of liquid dishwashing detergent in the water, then mix slowly. Smooth the decal with a finger to remove the soap water and any air bubbles. Start with your finger at one side and smooth the decal all the way to the other side. The soap water will evaporate, leaving the decal in perfect place. You can also use an ammonia-free window cleaning spray in place of the soap water. Thanks to Hans Mankinen for the soap water tip!
Small decals like door handles and fuel caps can be put on without the glass cleaner. Lift them off the paper with the tip of a hobby knife and ease them into position.
Finished!
You should be all set to go! Finish off your car or truck with chrome HPI wheels and radial tyres, and you'll be ready to start accepting trophies (or at least "oohs" and "aahs" from your fellow racers).
To clean your car after racing, denatured alcohol does a great job of removing overspray, permanent markers and "road rash".
If all you are going to use a particular body for is for demonstrations, you may not want to put antenna or ventilation holes in it. Many R/Cers have a 'display' body and spare set of clean wheels that they put on their car when they are not racing. This keeps the car looking fresh and 'garaged' while sitting on the shelf at home.
As a final touch before your car goes before the judges or on your shelf, liquid automotive car wax adds a great shine to dirty or dusty bodies.